Category: Culture & History

  • Lollapalooza 2027: Tickets, Interlagos, and Where to Stay

    Lollapalooza 2027: Tickets, Interlagos, and Where to Stay

    🇧🇷 POR | 🇫🇷 FR | 🇺🇸 EN | 🇪🇸 ES

    Lollapalooza 2027 takes place from March 19 to 21 at the Autódromo de Interlagos in São Paulo. Gates open at 11 am, last entry is at 10:30 pm, and the event is scheduled to wrap up at 1 am; check the official channels for the lineup and prices, as they may still change. To get there, the Autódromo station on Line 9-Esmeralda is the most direct option. This guide rounds up what’s been confirmed so far, how to plan your commute, and where to stay so the festival doesn’t turn into a marathon off the stages.

    Lollapalooza Brasil 2027 runs for three days, from March 19 to 21, at the Autódromo de Interlagos. Arrive via Line 9-Esmeralda, book a hotel connected to public transit, and confirm your ticket, gate, and times on the official site before you travel.

    The best strategy is to arrive via Line 9-Esmeralda, leave early, and book accommodation near a train or metro station—not necessarily right next to the racetrack.

    Lollapalooza 2027: dates, location, and what’s confirmed so far

    Lollapalooza Brasil 2027 will be held on Friday the 19th, Saturday the 20th, and Sunday the 21st of March at the Autódromo José Carlos Pace in Interlagos. According to the festival’s info page, gates open at 11 am, the Lolla Lounge opens at noon, last entry is at 10:30 pm, and the event closes at 1 am.

    Illuminated stage and crowd at a music festival
    Illustrative festival image. Photo: RahulPandit via Pixabay

    The event is rated for ages 16 and up. Younger attendees can enter accompanied by a parent or a responsible adult, with the waiver and documentation required by the organizers. Since a court ruling could update the rules, double-check this before buying. As of July 2026, the official Lollapalooza page hadn’t detailed the lineup, sections, or pricing; so don’t rely on artist lists or prices from social media as confirmation.

    Lollapalooza 2027 tickets: where to follow the sale

    Lollapalooza 2027 tickets should be purchased exclusively through links released by the festival itself. The official info page is the best starting point to check when sales open, ticket types, fees, half-price rules, and any perks. Save your receipt and the documents used for the purchase: at big festivals, entry may require the ticket holder to be identified according to current policy.

    Before you finalize the purchase, double-check which day or ticket type you selected and whether there’s a transfer policy. Avoid ads in groups and unofficial resellers: a tempting discount can turn into an invalid ticket at the turnstile. For a weekend trip, the full cost includes flights, hotel, nighttime transport, and food inside the event—not just the ticket price.

    Checklist before you pay

    • Confirm the date and ticket type.
    • Use only the channel indicated by the festival.
    • Read the rules for half-price and minors.
    • Plan your way back before choosing your hotel.

    How to get to Interlagos for Lollapalooza

    For those looking up how to get to Interlagos, the train is usually the most predictable option on festival day. The Autódromo station on Line 9-Esmeralda is a short walk from the entrances set up by the production team; check the official map closer to the date, as gates and routes can vary. If you’re coming from areas served by the metro, use the connection to Line 9 to plan your route.

    Go early: entry, security checks, and the final walk take longer than a regular commute. Taxis and ride-hailing apps work best for getting there outside peak times or for people with reduced mobility, but the exit is crowded and tends to involve waiting and surge pricing. If you’re driving, only count on parking after confirming there’s an official operation and that it serves your gate.

    Festival stage with colorful lights and smoke
    Illustrative festival image. Photo: Ostrovsky via Pixabay

    If you have a free day in São Paulo, you can pair the festival with a free walking tour of São Paulo’s historic center or a guided city tour—options that make more sense before the first day than between shows.

    Where to stay for Lollapalooza

    When deciding where to stay for Lollapalooza, prioritize access to the train and metro. Vila Mariana, Paraíso, and Paulista offer great restaurants and easy city transit, though they’re not the closest neighborhoods. Pinheiros and Vila Madalena are great bases for nightlife but require a connection to Line 9. Santo Amaro and Chácara Santo Antônio, on the other hand, cut down the trip to Interlagos and work well if you want to rest right after the festival.

    Book with free cancellation if you don’t have a ticket yet, and check the actual walking distance to the station. The post São Paulo in 3 Days helps you fit in extra days without crisscrossing the city for no reason. Also check out how to plan a first international trip and the tips in the article about a concert in São Paulo.

    Frequently asked questions

    When will Lollapalooza Brasil 2027 take place?

    Lollapalooza Brasil 2027 will take place from March 19 to 21, 2027, at the Autódromo de Interlagos in São Paulo.

    What time does Lollapalooza 2027 open?

    According to the organizers, gates for Lollapalooza Brasil 2027 open at 11 am; last entry is at 10:30 pm, and the event is scheduled to end at 1 am.

    How do I get to the Autódromo de Interlagos?

    The Autódromo station on Line 9-Esmeralda is the public transit reference for getting to the Autódromo de Interlagos; confirm the access route released by the festival.

    Is there a lineup and pricing for Lollapalooza 2027 yet?

    The lineup and pricing for Lollapalooza Brasil 2027 should be confirmed on official channels before you buy.

    Conclusion

    With your ticket, train, and hotel sorted before the trip, you’ll have plenty of energy left to enjoy the stages. Keep an eye on official updates and come back to Voyage Voyage when the festival releases new info.


  • Sacré-Cœur Basilica: The Climb, Hours, and the Dome

    Sacré-Cœur Basilica: The Climb, Hours, and the Dome

    🇧🇷 POR | 🇫🇷 FR | 🇺🇸 EN | 🇪🇸 ES

    The Sacré-Cœur Basilica sits atop Montmartre and works great as a morning start or late-afternoon stop in Paris: the nave is free, open every day, and the dome is a separate choice. The key is deciding what you want to do there—go inside, see the panorama, or explore the neighborhood—so you don’t waste time on the climb.

    Basilica entrance Free (verified Aug 2026)
    Dome €8 per adult; €5 for ages 15 and under (Aug 2026)
    Nave hours Daily, 6:30 AM–10:30 PM (Aug 2026)
    Expected wait 10–15 minutes between 10:30 AM and 5 PM, according to the basilica
    Address 35 rue du Chevalier de la Barre, 75018 Paris

    How to get to Sacré-Cœur

    To get to the Sacré-Cœur Basilica, get off at Anvers and walk up the stairs or take the Montmartre funicular at the foot of the hill. The on-foot option adds 222 steps up to the parvis; the funicular skips that part and drops you near the basilica, as noted by the Ville de Paris. From there, explore the neighborhood on foot.

    If you’re coming by metro, arrive at Anvers for the classic climb through Square Louise-Michel. Abbesses also works, but it drops you inside Montmartre and requires a walk up steep streets. To plan connections and getting around before your trip, use the complete Paris guide.

    Staircase leading up to the Sacré-Cœur Basilica in Paris
    The climb through Square Louise-Michel. Photo: Abdus Samad Mahkri / Pexels.

    Hours and the best time of day

    Every day, the Sacré-Cœur Basilica is open from 6:30 AM to 10:30 PM, with free entry, according to the official hours. Go before 10:30 AM if your priority is a calmer visit; after that, the parvis and tour groups take over the area.

    The interior is a place of worship, not a museum: keep quiet and dress appropriately. Official guidelines also prohibit photos in the nave. If you’re after exterior shots, early morning handles the facade and the staircase; if you want to see the city light up, save the parvis view for the end of the day and confirm the dome’s hours the day before.

    When to go to skip the line

    There is a line at the Sacré-Cœur Basilica: the administration estimates a 10-to-15-minute wait between 10:30 AM and 5 PM. Pick your time, arrive before the busiest stretch, and treat the line as part of the experience if you want to hit the dome before lunch. Go before 10:30 AM or save the nave for after 5 PM.

    There’s no way to turn the basilica into a five-minute drive-by. Set aside 30 to 45 minutes for the interior and the parvis; with the dome, add at least 45 more minutes for the stairs, the on-site ticket purchase, and the view. The trap is starting at the souvenir shops or Place du Tertre: you’ll reach the sanctuary right at peak foot traffic.

    How much it costs to visit Sacré-Cœur

    You get into the nave for free: entry costs nothing. The optional expense is the dome: €8 per adult and €5 for kids up to 15, rates confirmed in Aug 2026 on the official dome page. Tickets are sold at the ticket office next to the entrance.

    Real cost for one adult with no shopping: €0 to see the basilica; €8 if you add the dome (Aug 2026). Transport depends on your pass and where you’re staying, so don’t tack on a made-up number to the ticket price. If two adults go and both climb, the confirmed part of the budget is €16; keep that figure separate from metro, coffee, and souvenirs.

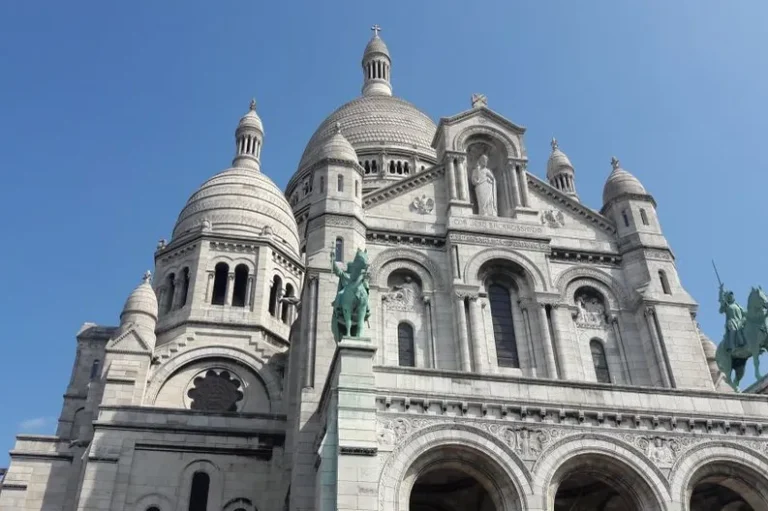
    Facade of the Sacré-Cœur Basilica in Montmartre, Paris
    The Sacré-Cœur facade in Montmartre. Photo: MAIROL JOSSUÈ ROJAS CALDERÒN / Pexels.

    The dome: who it makes sense for

    The Sacré-Cœur dome is worth it for anyone who wants a 360-degree panorama and can handle 280 steps on a narrow staircase. There’s no elevator on the route, and the basilica itself advises against the climb for people with mobility issues, very young kids, or anyone uncomfortable in tight spaces. The view is the payoff; the access is no shortcut.

    The basilica lists the dome as open daily, but hours can shift due to weather or maintenance, and there’s a midday break. Confirm on the official dome site the day before. If you’re not climbing, you still get the open view from the parvis, free and without stepping into the stairwell.

    A Montmartre itinerary that ends well

    Make the climb via Anvers, go into the basilica early, decide on the dome, and only then walk over to Place du Tertre. From the square, follow the smaller streets toward Place des Abbesses and head down when the neighborhood starts to lose its charm for you. This order keeps you from going up and down the hill twice, a common first-visit mistake.

    If the day still has energy left, swap the rush for another, less obvious viewpoint: the Belleville itinerary with street art and a view pairs better with a full afternoon. For a quieter park, check out the Parc des Buttes-Chaumont.

    To explore the neighborhood’s streets with a guide, you can check out the Civitatis free tour of Montmartre.

    First-visit mistakes

    • Confusing the free nave entrance with the paid dome visit.
    • Arriving between 10:30 AM and 5 PM expecting no line.
    • Buying the climb without considering the 280 steps and the lack of an elevator.
    • Planning photos inside the nave, where they’re not allowed.
    • Making Place du Tertre the main stop and leaving the basilica for the busiest hour.

    The right visit for your pace

    Sacré-Cœur requires little planning, but it does require a clear decision: a free nave visit for a quick stop, or the dome for €8 and the energy to tackle the stairs (Aug 2026). Arrive early, wander Montmartre afterward, and save the return to the metro for the end of your loop.

    Frequently asked questions

    Is there an elevator at the Sacré-Cœur Basilica?

    The Sacré-Cœur Basilica has elevator access to the building for people with disabilities or reduced mobility, via the back entrance on rue du Chevalier de la Barre. The dome has no elevator: it’s 280 steps up a narrow staircase.

    Does the Montmartre funicular bypass the Sacré-Cœur stairs?

    The Montmartre funicular bypasses the main 222-step climb between the foot of the hill and the Sacré-Cœur parvis. It doesn’t solve the dome, which still requires climbing 280 steps on foot.

    How can you combine Sacré-Cœur with Montmartre in the same day?

    Combine Sacré-Cœur with Montmartre by starting at Anvers, visiting the basilica early, and then walking through Place du Tertre and Abbesses. This sequence lets you tackle the climb just once and saves the neighborhood’s streets for when they’re at their liveliest.

  • Granada Spain: Alhambra Without Time Slip-Ups or Lines

    Granada Spain: Alhambra Without Time Slip-Ups or Lines

    🇧🇷 POR | 🇫🇷 FR | 🇺🇸 EN | 🇪🇸 ES

    Granada, Spain, calls for simple choices: set your base, book anything with a set time, and leave some wiggle room for getting around. With a block-by-block itinerary, you can see the main sights without turning your trip into a race between parking lots, lines, and viewpoints.

    Quick answer: plan for at least three days if you want to combine the highlights with real breaks; on a short visit, prioritize the most in-demand spot and one walkable area.

    How to plan Granada, Spain

    For Granada, Spain, the key decision at this stage is to reduce friction and save time for what really matters.

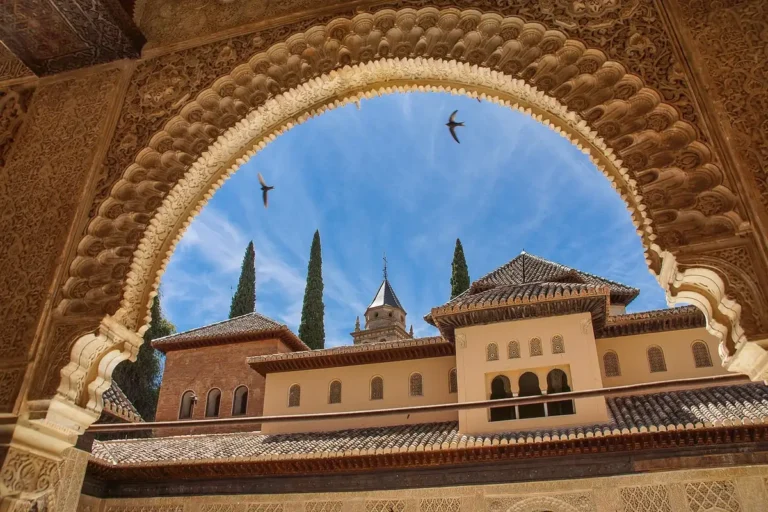
    Alhambra view from Granada
    Alhambra view from Granada. | Photo: franky1st / Pixabay

    How to plan Granada, Spain: First step: Start with the time slot that can’t change. Put that commitment early in the day and arrange the rest in geographic order; this sequence cuts down on backtracking and keeps you from realizing too late that the best light or access is already gone. Before you lock in the day, compare the distance on the map, the actual time, and the total cost. This check prevents an attractive-on-paper choice from turning into unnecessary travel and lets you swap plans without losing your trip’s main commitment.

    Practical itinerary to make the most of it

    For Granada, Spain, the key decision at this stage is to reduce friction and save time for what really matters.

    Practical itinerary to make the most of it: The most comfortable choice is to split morning, afternoon, and evening by neighborhoods or areas. Use the first block for the place with controlled entry, the second for a leisurely stroll, and the evening for dinner near your accommodation. Before you lock in the day, compare the distance on the map, the actual time, and the total cost. This check prevents an attractive-on-paper choice from turning into unnecessary travel and lets you swap plans without losing your trip’s main commitment.

    Where to stay and set up your base

    For Granada, Spain, the key decision at this stage is to reduce friction and save time for what really matters.

    Where to stay and set up your base: Check conditions and hours on the official source before you pay. Seasonal rules, tides, trails, and visitor capacity change; booking only after checking the operator’s page eliminates most surprises. Before you lock in the day, compare the distance on the map, the actual time, and the total cost. This check prevents an attractive-on-paper choice from turning into unnecessary travel and lets you swap plans without losing your trip’s main commitment.

    Granada at dusk
    Granada at dusk. | Photo: ELG21 / Pixabay

    Transportation, bookings, and travel pace

    For Granada, Spain, the key decision at this stage is to reduce friction and save time for what really matters.

    Transportation, bookings, and travel pace: Don’t fill every empty slot in your schedule. A long coffee, a brief rain shower, finding parking, or waiting for a bus are all part of the logistics; an hour of buffer makes the itinerary actually workable. Before you lock in the day, compare the distance on the map, the actual time, and the total cost. This check prevents an attractive-on-paper choice from turning into unnecessary travel and lets you swap plans without losing your trip’s main commitment.

    Final tips before you head out

    For Granada, Spain, the key decision at this stage is to reduce friction and save time for what really matters.

    Final tips before you head out: If you’re traveling without a car, focus on a base with a market, restaurants, and connections. With a car, choose parking and access before picking the hotel: a cheap nightly rate far from your route can cost you time every day. Before you lock in the day, compare the distance on the map, the actual time, and the total cost. This check prevents an attractive-on-paper choice from turning into unnecessary travel and lets you swap plans without losing your trip’s main commitment.

    Detail of Alhambra architecture
    Detail of Alhambra architecture. | Photo: ELG21 / Pixabay

    Frequently asked questions

    How do I buy Alhambra tickets?

    Buy your Alhambra ticket on the official channel and choose the time for the Nasrid Palaces carefully, as it’s fixed on the ticket. Bring the original ID used for the purchase and arrive with time to spare.

    How many days should I spend in Granada?

    Granada works well with two days for the Alhambra and the historic center; three days let you fit in Albaicín, Sacromonte, and breaks without cramming your schedule.

    Is a day trip from Seville worth it?

    A day trip from Seville is possible, but it loses Granada’s rhythm and leaves little room for the Alhambra. One night in the city greatly improves the experience.

    What are the Alhambra’s opening hours?

    The Alhambra generally opens from 8:30 AM to 6 PM in winter and until 8 PM in summer; the Nasrid Palaces require the exact time printed on your ticket.

    Conclusion

    Granada, Spain, works best when you book the essentials and embrace a doable pace. Use these choices as a starting point, confirm details on the official source, and round out your research with other city itineraries, tours and attractions, and nature trips. Voyage Voyage helps you put together a trip with less bad improvisation and more time to soak in your destination.

  • Stonehenge: Tickets, Hours, and How to Get There from London

    Stonehenge: Tickets, Hours, and How to Get There from London

    🇧🇷 POR | 🇫🇷 FR | 🇺🇸 EN | 🇪🇸 ES

    Stonehenge is the most famous prehistoric stone circle in the world, raised more than 4,000 years ago on the Salisbury Plain in Wiltshire, southern England. The sandstone and dolerite stones, some weighing 25 tons, were positioned with an astronomical precision that still baffles archaeologists.

    Stonehenge sits about 140 km west of London, near the town of Amesbury, and makes for an easy day trip. Adult tickets start at £22 when booked online (Jul/2026), the circle is roughly 4,500 years old, and the monument’s exact purpose—solar calendar, healing site, or ritual burial ground—remains an open question among researchers.

    How to get to Stonehenge

    There’s no direct train to Stonehenge. The most common route is a train from London to Salisbury (about 1h30 from Waterloo station), then a Stonehenge Tour bus that takes visitors the rest of the way in another 30 minutes. If you’d rather sort everything out in one go, most people opt for a tour leaving straight from London, with round-trip transport included and no connections to worry about.
    Stonehenge stones under a cloudy sky in Wiltshire, England
    The stone circle on the Salisbury Plain, Wiltshire. | Photo: Eren Cebeci / Pexels

    If you’re driving, there’s paid parking at the Visitor Centre itself, about 2.4 km from the stone circle—the trip out to the stones is by shuttle bus included in your ticket, or on foot in about 30 minutes along the historic Avenue path. There’s no train station in Amesbury or at Stonehenge: the train + bus combo via Salisbury remains the cheapest car-free option.

    If you’re mapping out a bigger Europe trip and want to tack London onto other capitals in the same itinerary, check out this suggested order for visiting Lisbon, Paris, and London before locking in your dates.

    Best time to visit and how long to allow

    The best time to visit Stonehenge is between March and September, when opening hours are longer (9:30 am to 7 pm) and the late-afternoon light is perfect for photos of the stones. Budget 2 to 3 hours total, including the Visitor Centre, the shuttle ride, and time at the circle itself.

    From September 30 to October 20, 2026, it closes at 6:30 pm, and from October 21 to March 30 at 5 pm—always with timed entry tickets, so showing up without a reservation can leave you turned away on busy days, especially weekends and UK school holidays.

    What to see at Stonehenge

    The Visitor Centre is your first stop: it houses a museum with archaeological finds from the area, life-size replicas of Neolithic huts built using period techniques, and the ticket office. That’s also where you pick up the audio guide—included with admission and available in 11 languages—before hopping on the shuttle to the monument.

    Close-up view of the megalithic stones at Stonehenge
    Detail of the sarsen stones, some over 4 meters tall. | Photo: Marvin Sacdalan / Pexels

    Around the circle, a roped path keeps visitors at a safe distance from the stones—access inside the monument is only allowed on special out-of-hours visits, sold separately and with far fewer spots. Save time to walk over to the burial mounds (barrows) visible in the distance, part of the same Neolithic funerary complex.

    History and origin of the stones

    Stonehenge was built in at least three major phases: around 3000 BC, a circular earthwork with ditches appeared, without the stones; between 2500 BC and 2000 BC, the bluestones arrived from the Preseli Hills in Wales, over 200 km away; and later came the massive sarsen stones, quarried from Marlborough Downs, about 30 km from the site. Each phase took centuries and involved thousands of people working with stone and wooden tools, with no pulleys or wheeled vehicles of any kind.

    The Wikipedia article on Stonehenge sums up much of the current academic consensus: the monument likely served multiple purposes over time, shifting from a ceremonial burial ground to an observatory aligned with the sunrise at the summer solstice and the sunset at the winter solstice. Recent excavations have also uncovered cremated remains of more than 60 people buried there, reinforcing the theory of an elite cemetery used for generations.

    Myths about Stonehenge

    One of the most repeated myths is that Stonehenge was built by the druids—in reality, druids only show up in British history almost 2,000 years after the monument was constructed, so the connection is purely symbolic, tied to modern ceremonies held on site. Another common myth credits giants or the magic of the wizard Merlin, a medieval legend with no archaeological basis whatsoever.

    It’s also a myth that Stonehenge is one of the 7 wonders of the modern or ancient world: the official list of the 7 modern wonders, voted in 2007, includes monuments like the Colosseum and Machu Picchu, but not Stonehenge. The monument is, however, a UNESCO World Heritage Site since 1986—a recognition that underscores its archaeological importance without needing the “wonder” title.

    What to pair with your visit

    Since Stonehenge sits isolated in the middle of the plain, most organized tours pair the monument with nearby towns to make the most of the day. Bath, with its Roman baths and Georgian architecture, is the most common add-on—it’s about an hour’s drive from Stonehenge.

    Another frequent combo is Windsor, right on the way between London and Stonehenge, letting you see the royal castle on the same day. If you’ve got more time, Oxford is also doable—a bit longer of a drive but still in the same central England region.

    Where to eat near Stonehenge

    The Visitor Centre itself has a café with quick options—sandwiches, soups, and afternoon tea—perfect if you’re only spending a few hours on site. For a fuller meal, Salisbury, about 15 minutes away by car, has traditional pubs and restaurants in its historic center, right by the Gothic cathedral.

    Amesbury, the closest village to the monument, has simpler, less touristy options—neighborhood pubs and small cafés, handy if you’re driving and don’t want to trek all the way to Salisbury.

    Where to stay

    Few visitors actually sleep near Stonehenge — most do it as a day trip from London or Bath. If you’d rather not head back the same day, you’ll find lodging in Salisbury, which has more hotel options and better transport links, or in Amesbury, which is simpler and closer to the archaeological site.

    Stonehenge rock formations seen up close
    The stones raised about 4,500 years ago on Salisbury Plain. | Photo: Walkerssk / Pixabay

    Bath, about an hour’s drive away, is another viable and more pleasant base for an overnight stay, since it offers more restaurant choices and nightlife than Salisbury or Amesbury.

    If you’re planning to fit Stonehenge into a larger UK trip, it’s worth checking whether a European city pass is worth it for your itinerary before buying individual tickets for each city.

    Practical tips and tickets

    Adult tickets start at £22 when booked in advance on the official English Heritage website (Jul 2026) — at the ticket office without a prior reservation, the price jumps to around £37. Kids pay from £17.20. Booking ahead also locks in your entry time, which is essential on busy days.

    Book your ticket at least 1 to 2 weeks in advance if your visit falls on a weekend, a UK bank holiday, or school vacation period — the most sought-after time slots (morning and late afternoon) sell out first. The ticket includes access to the Visitor Centre, the museum, the shuttle bus, and the audio guide in 11 languages.

    Stonehenge stone circle in an open field in England
    The archaeological site is open year-round, with hours varying by season. | Photo: Zane Holmes / Pexels

    If you want to get inside the stone circle — which is off-limits during regular opening hours — you’ll need to buy the separate “Stone Circle Experience” access, sold in small groups at dawn or dusk, with much more limited availability and a higher price tag.

    Frequently asked questions

    What is the history of Stonehenge?

    Stonehenge was built in stages between 3000 BC and 1500 BC, starting as a simple circular earthwork and later gaining the massive sarsen stones and the bluestones brought from Wales centuries later. Archaeologists believe the monument served as a solar calendar, a ritual burial ground, and a place of healing across different phases of use.

    What is the mystery of Stonehenge?

    The biggest mystery of Stonehenge is how the bluestones, weighing up to 4 tons, were transported more than 200 km from Wales without motorized vehicles, and what the monument’s exact purpose was. Researchers have no consensus on whether the site was a temple, an astronomical observatory, or a burial ground for the Neolithic elite.

    What city is Stonehenge in?

    Stonehenge sits on Salisbury Plain in the county of Wiltshire, near the small village of Amesbury and about 13 km from the city of Salisbury in southern England.

    Is Stonehenge worth visiting?

    Stonehenge is worth visiting if you’re interested in ancient history and archaeology, but the visit is quick — 2 to 3 hours is enough — and many visitors find the ticket price steep for the time spent there. Pairing it with Bath or Windsor on the same day usually makes for a more complete experience.

    How much does a Stonehenge ticket cost?

    A Stonehenge ticket costs from £22 for adults when booked online in advance (Jul 2026), and around £37 at the ticket office without a reservation. Kids pay from £17.20, with the exact price varying by day and time slot.

    Conclusion

    Stonehenge remains one of the most visited prehistoric monuments on the planet precisely because it combines mystery, archaeological precision, and a landscape that shifts in color. For those leaving London, the secret is booking your ticket in advance and fitting Bath or Windsor into the same itinerary. You’ll find more England and UK tips right here on Voyage Voyage.

  • Iran: Visas, Safety, and What to See in 10 Days

    Iran: Visas, Safety, and What to See in 10 Days

    🇧🇷 POR | 🇫🇷 FR | 🇺🇸 EN | 🇪🇸 ES

    Iran is home to some of the Middle East’s best-preserved historic cities—Isfahan, Shiraz, and Persepolis—but Brazil’s Ministry of Foreign Affairs (Itamaraty) advises against non-essential travel to the country in 2026 due to regional tensions. If you still decide to go, you’ll need to sort out your visa, carry cash (Visa and Mastercard don’t work due to sanctions), and follow a mandatory dress code for women throughout the country.

    Before any other planning: check the latest travel advisory from Itamaraty at gov.br/mre and assess the risk carefully—the Brazilian government currently advises against non-essential travel to Iran.

    Getting to Iran

    There are no direct flights from Brazil to Iran. The most common route involves a connection in Istanbul, Doha, or Dubai to Imam Khomeini International Airport (IKA) in Tehran, the country’s main gateway. Airlines like Turkish Airlines and Qatar Airways operate these connections regularly.

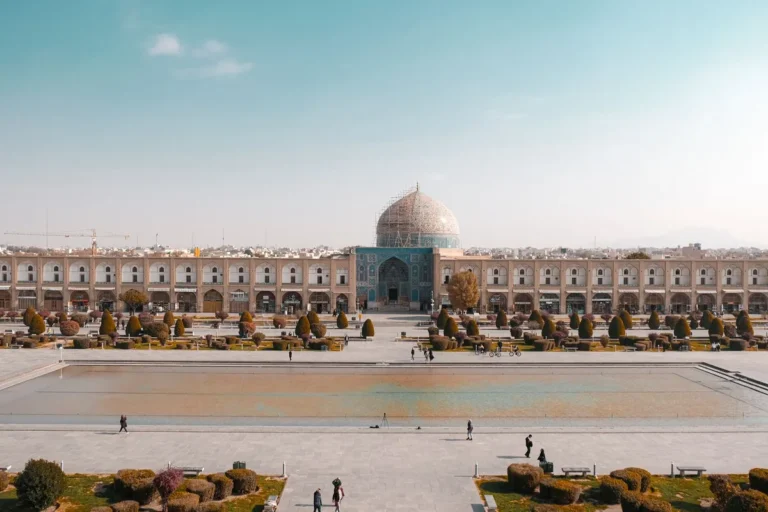
    Aerial view of Naqsh-e Jahan Square in Isfahan, Iran
    Naqsh-e Jahan Square in Isfahan is a UNESCO World Heritage Site and one of the largest squares in the world. | Photo: Necati Ömer Karpuzoğlu / Pexels

    The visa situation for Brazilians is a subject of conflicting information between sources. According to Iran’s Ministry of Foreign Affairs, the visa waiver currently applies only to citizens of a specific group of countries (such as Azerbaijan, Bolivia, Turkey, Syria, Lebanon, Georgia, Armenia, Venezuela, Egypt, Malaysia, and China)—Brazil is not on that list in the most recent official sources. For those who need to apply for a visa, the consular fee is around R$ 270 plus agent fees of about R$ 559, rates current as of July 2026, with a processing time of 10 business days. Before buying any tickets, confirm the current requirement directly with the Iranian Embassy in Brasília.

    It’s also worth noting that Brazil is considered by Iranian authorities to be a risk area for yellow fever transmission—you may be asked for your vaccination certificate upon arrival, depending on your recent travel history. Confirm this requirement with the consulate before you fly, as health rules change frequently.

    Best time to visit and how long to stay in Iran

    The best months to visit Iran are March to May (spring, mild temperatures) and September to November (fall, before the intense cold of winter on the Iranian plateau). Summer (June to August) is extremely hot in cities like Isfahan and Yazd, with daytime temperatures exceeding 40°C.

    A 10- to 12-day itinerary lets you cover the classic Iranian tourism circuit: Tehran, Isfahan, Shiraz, Persepolis, and Yazd. Those with less time (6 to 7 days) usually prioritize Tehran, Isfahan, and Shiraz, leaving Yazd and the desert out.

    Travelers who include Yazd in their itinerary typically add 1 to 2 nights in the Lut Desert, considered one of the hottest places on Earth in the height of summer—the most sought-after experience is spending a night camping in the dunes, stargazing far from the cities’ light pollution. This extension is usually organized by local agencies in Yazd, with 4×4 transport included.

    What to see in Iran

    Iran’s historical circuit concentrates its main attractions in three hubs: Isfahan (Safavid architecture), Shiraz and Persepolis (ancient Persian heritage), and Tehran (the capital, with museums and palaces).

    Naqsh-e Jahan Square and the mosques of Isfahan

    Naqsh-e Jahan Square, built in the early 17th century, is the second-largest square in the world and is surrounded by the Shah Mosque (Masjed-e Shah), the Sheikh Lotfollah Mosque, and the Ali Qapu Palace. It’s been a UNESCO World Heritage Site since 1979 and is the historic heart of Isfahan, considered by many travelers to be Iran’s most beautiful city.

    Persepolis, the ancient Persian capital

    Persepolis was the ceremonial capital of the Achaemenid Empire, founded by Darius I around 518 BC and burned down by Alexander the Great in 330 BC. The ruins—monumental columns, the Gate of All Nations, and stone-carved reliefs—lie about 60 km from Shiraz and have been a UNESCO World Heritage Site since 1979.

    Ruins of the Gate of All Nations at Persepolis, Iran
    The columns of Persepolis have stood for over 2,500 years, about 60 km from Shiraz. | Photo: Masih Shahbazi / Pexels

    Nasir al-Mulk Mosque (Pink Mosque), Shiraz

    Informally known as the Pink Mosque, Nasir al-Mulk was completed in 1888 and is famous for its colorful stained-glass windows that cast a kaleidoscope of light onto the floor during the early morning hours. Arrive right after it opens, around 8 a.m., to see the light effect at its peak—it fades as the sun rises higher.

    Interior of the Nasir al-Mulk Mosque (Pink Mosque) in Shiraz, Iran, with colorful stained glass
    The stained glass of the Nasir al-Mulk Mosque creates a colorful light show only in the early morning. | Photo: Micha Höfer / Pexels

    Tehran: museums, palaces, and the former American Embassy

    The capital is home to the National Museum of Iran (with artifacts dating back to the pre-Islamic period), Golestan Palace (the residence of the Qajar shahs, also a UNESCO World Heritage Site), and the complex of the former United States Embassy, now a museum informally known as the “Museum of American Arrogance,” a reference to the 1979–1981 hostage crisis.

    Milad Tower, at 435 meters tall, is Tehran’s highest point and has a panoramic observation deck open to the public—a great place to get your bearings on your first afternoon in the city, as Greater Tehran sprawls over a massive area at the foot of the Alborz Mountains. Tehran’s Grand Bazaar, one of the world’s largest covered markets, is where most locals still buy Persian rugs, spices, and gold—worth setting aside half a morning to wander its corridors at a leisurely pace.

    What to pair with Iran

    Since most flights to Tehran connect through Istanbul, Doha, or Dubai, it’s common to combine Iran with a few days in another Middle Eastern destination on the same trip. If you’re stopping in Istanbul, for example, you can take the chance to explore Istanbul before or after your Iranian leg, as the Turkish city is a natural hub between Europe and Asia. If you prefer a Dubai layover, the Dubai guide here on Voyage Voyage has a ready-made itinerary for 2 to 3 days before heading on to Tehran.

    Where to eat in Iran

    The most traditional dish is kebab koobideh, seasoned ground meat grilled on a skewer, served with basmati rice and butter (the so-called chelo kabab). Another classic is ghormeh sabzi, a herb stew with red beans and meat, considered by many Iranians to be the country’s unofficial national dish.

    Black tea is the ubiquitous drink, served in small glasses and usually accompanied by a sugar cube to hold between your teeth while you sip—a traditional custom instead of sweetening the tea directly. Alcoholic beverages are banned throughout Iran, including for tourists.

    Where to stay in Iran

    Isfahan has the best selection of historic accommodations, including hotels set in restored traditional houses (khane) with inner courtyards and Persian decor. In Yazd, it’s worth seeking out lodging within the old adobe city, a UNESCO World Heritage Site since 2017, to experience the mud-brick architecture and wind towers (badgir) up close. Tehran has the country’s largest and most modern hotel network, catering to both tourists and business travelers.

    Practical Tips for Iran

    Visa and Mastercard don’t work in Iran due to international sanctions — bring cash (euros or dollars) to exchange at currency exchange offices, or get a local debit card for tourists, like those offered by fintechs such as Mah Card or DaricPay, with pickup at Imam Khomeini Airport.

    Wearing the veil (hijab) is mandatory for women throughout Iran, including tourists — bring scarves to cover your hair and clothes that cover your arms and legs. It’s forbidden to enter the country with drones or professional filming equipment without prior ministerial authorization. Worth repeating: check the official recommendations from the Brazilian Ministry of Foreign Affairs (Itamaraty) before booking your trip, as the security situation in the region changes frequently.

    Common Western travel apps like Google Maps, WhatsApp, and Instagram work erratically or get blocked without a VPN set up before you arrive — download and configure your VPN app while still in Brazil, because local app stores have restricted access to these services. For getting around cities, local apps like Snapp (Iran’s equivalent of Uber) work well and are usually the most practical option for tourists.

    Facade of the Shah Mosque at Naqsh-e Jahan Square, Isfahan, Iran
    The Shah Mosque (Masjed-e Shah) closes off one side of Naqsh-e Jahan Square in Isfahan. | Photo: muaz semih güven / Pexels

    Frequently Asked Questions

    Is it safe to travel to Iran right now?

    The Brazilian Ministry of Foreign Affairs (Itamaraty) recommends that Brazilians avoid non-essential travel to Iran in 2026, due to regional tensions that raise the risk above normal levels. The recommendation doesn’t ban travel, but it does indicate elevated risk — check the updated alert on the official Itamaraty website before deciding.

    Do Brazilians need a visa for Iran?

    According to Iran’s Ministry of Foreign Affairs, the visa waiver applies only to a specific group of nationalities, and Brazil isn’t on that list in the most recent official sources. There’s conflicting information among sources about recent exemptions, so the recommendation is to confirm the requirement directly with the Iranian Embassy in Brasília before buying tickets.

    Do credit cards work in Iran?

    No. Visa and Mastercard don’t work in Iran due to international sanctions imposed on the country’s banking system. Tourists need to bring cash (euros or dollars) to exchange at currency exchange offices, or arrange a local debit card specifically for foreign visitors.

    How many days do you need to see Iran?

    A 10 to 12-day itinerary in Iran comfortably covers Tehran, Isfahan, Shiraz, Persepolis, and Yazd. Those with less time — 6 to 7 days — usually prioritize Tehran, Isfahan, and Shiraz, leaving Yazd and the desert off the itinerary.

    Conclusion

    Iran holds some of the richest historical heritage in the Middle East, but it demands careful planning — from the Itamaraty travel advisory to the logistics of carrying cash. For more itineraries across Asia and the Middle East, keep exploring voyagevoyage.com.br.

  • Bhutan: Costs, Visa, and What to See in 5 Days

    Bhutan: Costs, Visa, and What to See in 5 Days

    🇧🇷 POR | 🇫🇷 FR | 🇺🇸 EN | 🇪🇸 ES

    Bhutan is the only country in the world that measures progress by Gross National Happiness instead of GDP, and it charges a daily fee to keep tourism small-scale. Visitors to Bhutan in 2026 pay the Sustainable Development Fee (SDF) of USD 100 per night, must arrange their visa through a licensed agency, and will find an itinerary concentrated in three valleys: Paro, Thimphu, and Punakha.

    Bhutan isn’t a last-minute destination: the USD 100/night SDF and the agency pre-approved visa make the trip feel more like an all-inclusive package than a free-form itinerary—but the payoff is a country that hasn’t yet become a showcase for mass tourism.

    How to get to Bhutan

    Bhutan has only one major international airport, Paro Airport (PBH), surrounded by mountains and operated by a handful of pilots certified for the landing—which is why only two airlines fly there: Drukair and Bhutan Airlines. There are no direct flights from Brazil; the most common route departs from New Delhi, Kathmandu, Bangkok, or Singapore, with a final connection to Paro.

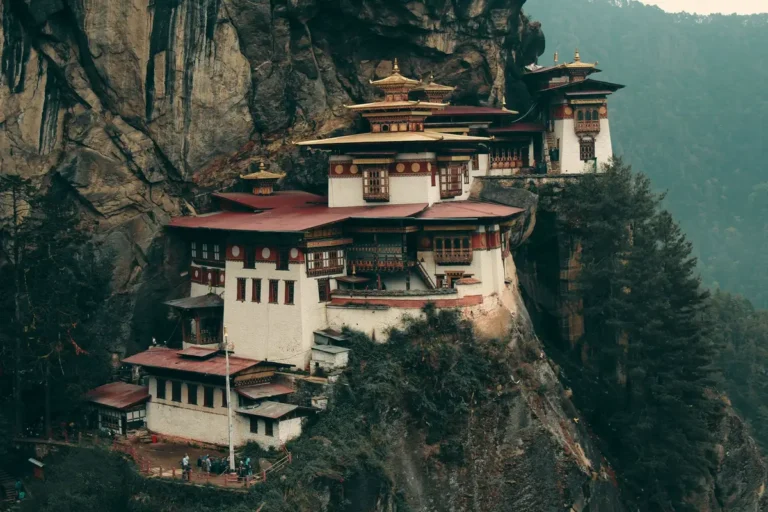
    Taktsang Monastery, the Tiger's Nest, perched on a cliff in Paro, Bhutan
    Taktsang Monastery (Tiger’s Nest) sits at 3,100 meters above sea level, on a 900-meter cliff in Paro. | Photo: Tenzing T / Pexels

    You can’t just buy a ticket and land as an independent traveler: the visa is only issued after a travel agency licensed by the Bhutanese government submits your complete itinerary and proof of package payment. The visa fee is a flat USD 40, regardless of nationality, and the process usually takes 5 to 10 business days. Citizens of India, Bangladesh, and the Maldives don’t need a visa, just an entry permit.

    The landing in Paro is considered one of the most technical in the world: the runway sits between mountains up to 5,500 meters, requiring a manual visual approach and forcing flights to operate only during daylight with good visibility. That’s why only a few dozen pilots worldwide are certified to land there, and flights are often canceled or rescheduled on days of heavy fog—so it’s wise to leave at least one buffer day between your arrival and any rigid commitments.

    After landing in Paro, all internal travel is by road, since Bhutan has no trains and Paro is the only significant commercial airport (there are smaller airstrips in Bumthang, Yongphula, and Gelephu, used for occasional domestic flights). The road between Paro, Thimphu, and Punakha winds through mountain passes with tight switchbacks—the drive from Thimphu to Punakha, for example, takes about 3 hours and crosses the Dochula Pass at 3,100 meters, with Himalayan views on clear days.

    Best time to visit and how long to stay in Bhutan

    The best months for Bhutan are March to May (spring, with blooming rhododendrons) and September to November (clear skies, Tshechu festivals). These two periods are considered high season and cost USD 250 per person/day in SDF; December to February and June to August fall in low season, with an SDF of USD 100 per person/day—cheaper, but with monsoon rain risk between June and August. Official SDF rates are always updated on the Bhutan Department of Tourism website.

    A 5 to 7-day itinerary comfortably covers Paro, Thimphu, and Punakha, including the hike to the Tiger’s Nest. Those with 10 days or more can extend to the Bumthang valley, which is more remote and less visited.

    The Tshechu festivals are worth planning around if you have date flexibility: they’re religious celebrations with masked dances held at specific dzongs, usually in October or November (dates change yearly according to the Bhutanese lunar calendar). The most popular is the Thimphu Tshechu, which draws locals dressed in traditional attire (gho for men, kira for women) and tends to fill the capital’s hotels months in advance.

    What to see in Bhutan

    The classic Bhutan itinerary revolves around three cities: Paro (the gateway and the Tiger’s Nest), Thimphu (the capital), and Punakha (the country’s most beautiful dzong).

    Taktsang Monastery (Tiger’s Nest), Paro

    It’s the most photographed image of Bhutan: a monastery clinging to a 900-meter cliff at 3,120 meters above sea level. The uphill trail takes 2.5 to 4 hours one way, with a viewpoint halfway where you can grab tea before the steeper final stretch. Start the hike before 8 a.m. to beat the midday heat and the larger groups that arrive after 9 a.m.

    Punakha Dzong and Suspension Bridge

    Punakha Dzong, built in 1637 at the confluence of two rivers (Pho Chhu and Mo Chhu), was Bhutan’s administrative capital until 1955 and remains the most photogenic of the country’s fortress-monasteries. A few minutes’ drive away is the Punakha Suspension Bridge, one of the longest in Bhutan, with views over the valley and river.

    Punakha Dzong by the river, with Bhutan's mountains in the background
    Punakha Dzong sits at the confluence of the Pho Chhu and Mo Chhu rivers in the Punakha valley. | Photo: Nilanjan Haldar / Pexels

    Buddha Dordenma and Tashichho Dzong, Thimphu

    The capital, Thimphu, has no traffic lights—traffic is directed by a policeman in an ornate booth in the city center. The Buddha Dordenma, a 51.5-meter gilded bronze statue on a hill overlooking the valley, is visible from almost anywhere in the city and houses over 100,000 smaller Buddha statues inside. Tashichho Dzong, the seat of government and the king’s office, only opens to the public in the late afternoon, after the staff have left.

    It’s worth setting aside half a morning for the Memorial Chorten, built in 1974 in honor of Bhutan’s third king, where locals walk in circles (kora) spinning prayer wheels—it’s one of the few places in the country where you can observe daily Bhutanese religious life without feeling like you’re interrupting a ceremony closed to tourists. The Folk Heritage Museum and Thimphu’s weekend market, with farm goods brought in from nearby villages, round out an afternoon in the capital nicely.

    Buddha Dordenma statue on the hill above Thimphu, Bhutan's capital
    The Buddha Dordenma stands 51.5 meters tall and dominates the view over the Thimphu valley. | Photo: Anil Sharma / Pexels

    What to pair with Bhutan

    Since there are no direct flights from Brazil, most travelers combine Bhutan with Nepal (Kathmandu, a 1.5-hour flight away) or India (New Delhi or Kolkata), making the most of the same air connection so they don’t pay for the intercontinental leg twice. If you’re already in India and want to add another regional classic, the Taj Mahal is just a few hours from New Delhi and often slots into the same itinerary. Travelers already in the region also tend to add 3 to 4 days in Bhutan to a larger Himalayan route, including treks in Nepal.

    Where to eat in Bhutan

    The national dish is ema datshi, chili cooked in a cheese sauce, served with red rice at almost every restaurant in the country—ask for the “mild” version if you’re not used to spice, because the traditional recipe is seriously hot. The hotel buffets included in your package are usually the most practical option, since independent restaurants are scarce outside Thimphu and Paro.

    You should also try momo (dumplings stuffed with meat or vegetables, a legacy of Tibetan and Nepalese cuisine) and Bhutanese red rice, a variety grown in the high-altitude valleys with a firmer texture and a slightly sweet flavor. A local alcoholic drink worth sampling: ara, a traditional distillate made from rice or corn, served warm at family gatherings — some hotels offer a milder version for tourists.

    Where to Stay in Bhutan

    Accommodation is already included in the package arranged by your agency, but travelers can choose between categories: 3-star hotels covered by the minimum daily tariff, or upgrades to luxury resorts like those from the Six Senses and Aman chains, which charge an additional fee on top of the SDF. Paro has the options closest to the airport and the Tiger’s Nest trail; Thimphu has the capital’s widest range of hotels.

    Punakha Valley with traditional Bhutanese architecture and mountains in the background
    The Punakha Valley combines traditional architecture and mountain scenery less than 3 hours from Thimphu. | Photo: ycchen / Pixabay

    Practical Tips for Bhutan

    Every tourist (except Indians, Bangladeshis, and Maldivians) must hire a licensed agency, which handles the visa, the mandatory guide, and the driver — traveling solo without a fixed itinerary is not allowed in Bhutan. The minimum daily cost of USD 200 (low season) or USD 250 (high season) already includes accommodation, meals, internal transport, and a guide — only international airfare is excluded.

    Pack layers: Paro and Thimphu sit between 2,200 and 2,500 meters above sea level, with cold nights even in spring. Photographing the interiors of dzongs and monasteries is usually prohibited — ask your guide before taking any photos in sacred spaces.

    Frequently Asked Questions

    How much does it cost to travel to Bhutan?

    Traveling to Bhutan costs from USD 100 per person per day in the low season (December to February, June to August) or USD 250 per day in the high season (March to May, September to November), plus the USD 40 visa fee. This amount covers accommodation, meals, a guide, and internal transport, but does not include the international airfare.

    Do I need a visa to enter Bhutan?

    Yes, Brazilians need a visa for Bhutan, unless they are citizens of India, Bangladesh, or the Maldives. The visa is only issued after a licensed travel agency submits your itinerary and proof of payment for the full package to the government — there is no visa for independent travelers.

    How many days do I need to see Bhutan?

    A 5 to 7-day itinerary in Bhutan covers Paro, Thimphu, and Punakha, including the hike to Taktsang Monastery (Tiger’s Nest). Trips of 10 days or more allow you to include the Bumthang Valley, which is more remote and less visited by tourists.

    Can I travel to Bhutan without a guide?

    No. Bhutan requires every foreign tourist (except Indians, Bangladeshis, and Maldivians) to book a package through a licensed agency, which includes a guide and driver for the entire stay. There is no visa option for independent travelers without a fixed itinerary.

    Conclusion

    Bhutan charges a high price to keep tourism small, and that’s exactly what preserves the dzongs, the trails, and the valleys without the crowds of other Himalayan destinations. For more Asia itineraries and other off-the-beaten-path destinations, keep exploring voyagevoyage.com.br.

  • Hiroshima and Miyajima: A No-Rush Itinerary

    Hiroshima and Miyajima: A No-Rush Itinerary

    🇧🇷 POR | 🇫🇷 FR | 🇺🇸 EN | 🇪🇸 ES

    Hiroshima and Miyajima are less than an hour apart, and fitting both into the same itinerary is not only possible but highly recommended. Most travelers do the trip as a day trip from Kyoto or Osaka, but spending one night in Hiroshima completely changes the pace—and lets you see Miyajima’s torii at both high and low tide.

    To visit Hiroshima and Miyajima on the same itinerary, the most practical route is to arrive by shinkansen (1h40 from Kyoto, covered by the JR Pass), dedicate the morning to the Peace Memorial Park and the Atomic Bomb Museum, then head to Miyajima island in the afternoon via the JR Sanyo Line (25 min) plus the JR ferry (10 min, included in the JR Pass). With a full day, you can cover the highlights of both destinations without rushing.

    How to get to Hiroshima and Miyajima

    From Kyoto or Osaka, the Nozomi shinkansen takes about 1h40 to Hiroshima Station—but note: the Nozomi is not covered by the Japan Rail Pass. If you have the JR Pass, use the Hikari or Sakura, which cover the same route in about 2 hours. A one-way Kyoto–Hiroshima ticket costs ¥11,210 (July 2026), which alone justifies the pass if your trip includes more than two long legs.

    Atomic Bomb Dome in Hiroshima known as Genbaku Dome
    The Atomic Bomb Dome (Genbaku Dome)—the building that survived the epicenter of the 1945 explosion. | Photo: Zonghao Feng / Pexels

    From Hiroshima to Miyajima, take the JR Sanyo Line from Hiroshima Station to Miyajimaguchi (25 min, ¥420). From the station, it’s a 5-minute walk to the ferry terminal. The JR West Miyajima Ferry costs ¥200 per leg and is included in the JR Pass—and it takes a special route that passes closer to the floating torii. The alternative is the Matsudai Kisen ferry, same price, but without the torii route and not covered by the JR Pass.

    Best time to visit and how long to stay

    Hiroshima and Miyajima work year-round, but two windows stand out: spring (late March to mid-April), when cherry blossoms bloom in Peace Park and on the island; and autumn (mid-November), when the momiji (Japanese maples) turn Miyajima red. Summer (July–August) is hot and humid, with temperatures above 30°C—doable, but tiring for walking.

    At day-trip pace, a full day is enough for the highlights. But spending one night in Hiroshima lets you see Miyajima at a relaxed pace, catch the torii at low tide (when you can walk right up to its base) and at high tide (when it “floats”). Two full days cover everything without rushing, including Hiroshima Castle and trails on Miyajima like Mount Misen.

    What to see in Hiroshima and Miyajima

    Hiroshima: Peace Memorial Park

    Peace Memorial Park sits at the epicenter of the August 6, 1945 explosion and brings together the Peace Museum (entry ¥200, July 2026), the Cenotaph, the Peace Flame, and the Atomic Bomb Dome (Genbaku Dome), a UNESCO World Heritage Site. Set aside at least 2 hours for the museum—the exhibition was renovated in 2019 and is one of the most impactful in Japan. Arrive before 9 a.m. to beat the school excursion groups, which pack the museum from 10 a.m. onward.

    Miyajima: the floating torii and Itsukushima Shrine

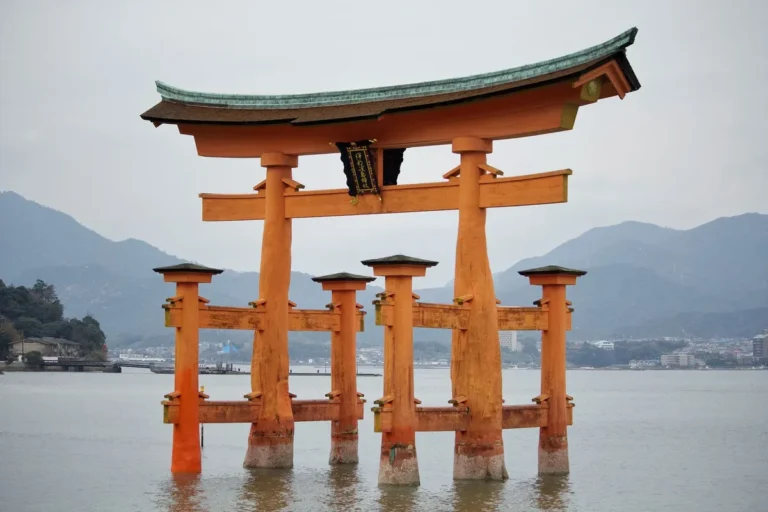
    Miyajima island (official name: Itsukushima) is famous for its 16-meter red torii that seems to float on the water at high tide. The Itsukushima Shrine, also a UNESCO World Heritage Site, charges ¥300 to enter the structure on stilts (July 2026). The whole island is walkable, and sika deer roam freely through the streets—they’re tame, but guard your food.

    Floating torii of Itsukushima Shrine in Miyajima, Japan
    Miyajima’s torii at high tide—at low tide, you can walk right up to its base. | Photo: Niccolò Chiamori / Pexels

    Beyond the torii, it’s worth climbing Mount Misen (535 m) via the Miyajima Ropeway (¥1,840 round trip, July 2026)—the top offers views over the Seto Inland Sea and, on clear days, even the Shimanami Kaido bridges. The hike up via the Momijidani trail takes about 1h30 and passes through a spectacular maple forest in autumn.

    What to combine in your itinerary

    Hiroshima and Miyajima fit naturally into a larger Japan itinerary. The most classic combo is Kyoto + Hiroshima/Miyajima + Osaka, all connected by shinkansen. From Hiroshima, you can do a day trip to Onomichi (a coastal town with hillside temples, 1h20 by train) or head down to Iwakuni to see the Kintaikyo Bridge (40 min by train).

    If your trip includes Tokyo, the 7-day JR Pass covers the entire Tokyo–Kyoto–Hiroshima route and back. For first-timers to Japan, a 12-to-15-day itinerary with Tokyo, Hakone or Kawaguchiko, Kyoto, Nara, and Hiroshima/Miyajima covers the big classics without rushing.

    Where to eat in Hiroshima

    Hiroshima has its own food identity, and the dish that defines the city is Hiroshima-style okonomiyaki—unlike Osaka’s, which mixes everything into the batter, Hiroshima’s layers the ingredients separately: thin batter, cabbage, bean sprouts, yakisoba noodles, meat or seafood, and egg, all stacked on the griddle. The most famous place to try it is Okonomimura, a building with 24 okonomiyaki restaurants near Peace Park.

    Wild deer on Miyajima island in Japan
    Sika deer roam freely around Miyajima—tame, but they’ve got their eyes on your food. | Photo: Zonghao Feng / Pexels

    On Miyajima, the specialty is momiji manju—a maple-leaf-shaped cake filled with red bean paste (anko), custard, or chocolate. Also try the grilled oysters (kaki) on the main Omotesando street, harvested from the sea around the island. An okonomiyaki in Hiroshima costs between ¥900 and ¥1,500 (July 2026), and momiji manju go for ¥100–150 each.

    Where to stay in Hiroshima

    For those doing a day trip, the usual base is Kyoto or Osaka. But if you choose to sleep in Hiroshima, the best location is between Hiroshima Station and the Peace Park — it’s about a 20-minute walk, and the streetcar connects the two in 15 minutes for ¥220. Japanese-style business hotels (Toyoko Inn, Dormy Inn) run between ¥6,000 and ¥10,000 per night (July/2026) and usually include a rooftop onsen.

    On Miyajima, there are also ryokans (traditional inns) for those who want the experience of sleeping on the island — but they’re pricier (from ¥15,000 per person with dinner). The upside is seeing the island nearly empty at dusk and early morning, once the day-trippers have gone.

    Practical Tips

    Before heading to Miyajima, check the tide table on the island’s official website — the difference between high and low tide completely changes the scenery around the torii. The ideal is to arrive at low tide, walk out to the base of the torii, and stay until the tide rises to see the “floating” effect.

    Hiroshima Peace Memorial Park in autumn with colorful leaves
    The Peace Memorial Park in autumn — visiting the museum takes at least 2 hours. | Photo: Dmitry Romanoff / Pexels

    Your IC card (Suica, Pasmo, or Icoca) works on Hiroshima’s streetcars and vending machines, but NOT on the JR ferry to Miyajima — there, it’s JR Pass or a single ticket at the counter. Bring cash yen for Miyajima: many small shops and food stalls don’t accept cards. And one detail that saves time: the Peace Museum sells timed-entry tickets online, which lets you skip the box office line, especially during peak season.

    If you’d like a local guide in Portuguese, the guided tour of Hiroshima from Civitatis covers the Peace Park with detailed historical context.

    Frequently Asked Questions

    Can you visit Hiroshima and Miyajima in the same day?

    Yes, you can visit Hiroshima and Miyajima in the same day. The trip between the two takes about 35 minutes (train + ferry). Most travelers spend the morning at the Peace Memorial Park and the Atomic Bomb Museum in Hiroshima, then head to Miyajima in the afternoon to see the floating torii and Itsukushima Shrine.

    Does the JR Pass cover the ferry to Miyajima?

    The JR Pass covers the JR West ferry to Miyajima, which costs ¥200 per leg for those without the pass. The Matsudai Kisen ferry, which operates on the same route, is not covered by the JR Pass. The JR ferry has the advantage of taking a route that passes closer to the floating torii.

    What’s the best order to visit Hiroshima and Miyajima?

    The best order to visit Hiroshima and Miyajima depends on the tide table. If low tide falls in the morning, start with Miyajima to walk out to the base of the torii and leave Hiroshima for the afternoon. If low tide is in the afternoon, do Hiroshima in the morning and Miyajima after. Checking the tide table before planning your route avoids frustration.

    Do you need a JR Pass to go to Hiroshima?

    You don’t strictly need a JR Pass to go to Hiroshima, but it’s worth the money if your trip includes more than two long shinkansen legs. A single Kyoto–Hiroshima ticket costs ¥11,210 per leg (July/2026), so a round trip already exceeds the value of the 7-day JR Pass for those combining Tokyo, Kyoto, and Hiroshima.

    What’s something to eat in Hiroshima that you can’t find elsewhere in Japan?

    The most iconic dish in Hiroshima is Hiroshima-style okonomiyaki, which differs from Osaka’s by layering the ingredients separately instead of mixing them into the batter — it includes yakisoba noodles, cabbage, bean sprouts, and egg stacked on the griddle. Okonomimura, a building with 24 specialty restaurants near the Peace Park, is the most popular spot to try it.

    Conclusion

    Hiroshima and Miyajima complement each other in a rare way: the heavy memory of the Peace Park and the serene beauty of the torii over the water create a contrast that stays with you. With the JR Pass, the journey is practically free, and a well-planned day (or two, if you can) covers both destinations with room to spare. For more Japan itineraries, explore the Voyage Voyage guides.

  • European City Pass: 3 Steps to Know If It’s Worth It

    European City Pass: 3 Steps to Know If It’s Worth It

    🇧🇷 POR | 🇫🇷 FR | 🇺🇸 EN | 🇪🇸 ES

    Almost every major city in Europe sells a city pass promising savings and skip-the-line access — but it doesn’t always deliver. A European city pass can save you hundreds of euros on a week-long trip, or it can become an expensive card you barely use, depending on your travel style. The difference comes down to doing the math before you buy.

    A European city pass pays off when you visit at least 3 paid attractions per day and want to skip the lines at crowded museums — below that, buying individual tickets is usually cheaper.

    How a European city pass works

    A city pass is a card (physical or digital) that gives you access to a bundle of attractions, public transportation, and in some cases, cruises or hop-on-hop-off buses for a fixed price. You buy the pass for a set number of days (usually 1 to 6), and during that period you can enter included attractions without buying individual tickets.

    Tourists at the base of the Eiffel Tower in Paris
    Line at the Eiffel Tower — with the right city pass, the wait drops from 2 hours to 15 minutes. | Photo: Regan Dsouza / Pexels

    The two biggest operators in Europe are Go City (which sells the Explorer Pass and the All-Inclusive Pass) and CityPASS (focused on smaller bundles with curated attractions). On top of those, many cities have their own official passes — the Lisboa Card, the Roma Pass, and the Paris Museum Pass are prime examples. Each has different activation rules, validity periods, and coverage, which is exactly why comparing before you buy is a must.

    Best time to use it and how many days to buy

    A city pass delivers the most value in peak season (June to September), when lines at attractions are longer and the skip-the-line perk really matters. At the Louvre, for example, the standard line can stretch to 90 minutes in summer, while Museum Pass holders get in within 10 to 15 minutes through the dedicated entrance. In the off-season, lines shrink and the line-skipping benefit loses some of its punch.

    As for duration: if you’re torn between 2 and 3 days, go with 3 — the price difference is usually small (10 to 15 euros) and the extra flexibility saves you from rushing. The break-even point for a 2-day pass typically comes with 3 to 4 attractions visited; for longer passes, the break-even point rises proportionally.

    Which European cities have a city pass

    Practically every capital and tourist city in Europe has at least one city pass. The differences in coverage and value for money are huge. Here’s an overview of the most popular ones among Brazilian travelers:

    Paris: the Paris Museum Pass (2, 4, or 6 days) covers more than 50 museums and monuments, including the Louvre, Versailles, and the Orsay, with priority entry. The Paris Pass Plus adds transportation, a Seine cruise, and a hop-on-hop-off bus — the cost per day runs around 52 euros on the 6-day pass (Jul/2026, check the official site). To discover neighborhoods that don’t need a pass, check out the itinerary for Belleville in Paris. To plan your full itinerary, see the guide to Lisbon, Paris, and London on one trip.

    Tourists visiting the Colosseum in Rome
    Colosseum — the 2026 Roma Pass no longer guarantees automatic skip-the-line access here. | Photo: Ömer Faruk Uyar / Pexels

    Rome: the Roma Pass comes in a 48-hour version (1 free attraction + discounts) and a 72-hour version (2 free attractions + discounts + transportation). In 2026, the Roma Pass no longer works as an automatic line-skipper at the Colosseum — spots for pass holders are limited and separate from regular tickets. For many simple itineraries, buying a standalone Colosseum ticket ends up cheaper than the pass.

    Lisbon: the Lisboa Card (24, 48, or 72 hours) includes unlimited public transportation (metro, buses, trams, elevators), free entry to more than 30 museums, and discounts at attractions like the Oceanário. It’s one of the best-value passes in Europe because transportation alone already eats up a good chunk of the price.

    London: the London Pass (Go City) covers more than 80 attractions, including the Tower of London, Westminster Abbey, and a Thames cruise. The price is steep, but if you visit 3 or more paid attractions a day, you’ll see the return by day two.

    Amsterdam: the I Amsterdam City Card includes public transportation, a canal cruise, and entry to museums like the Rijksmuseum. The Van Gogh Museum and the Anne Frank House are not included — they require separate reservations, which is a key thing to watch out for.

    How to calculate if the city pass is worth it

    The method is simple and takes 5 minutes. Do it before buying any pass:

    Step 1: list all the attractions you’ll actually visit (not the ones you “might” visit). Be honest — if you’re the type to hit 1 museum a day and spend the rest of the time walking around, the pass probably isn’t worth it.

    Step 2: add up the price of individual tickets for each attraction on your list. Include the cost of public transportation separately, if the pass you’re comparing includes transit.

    Step 3: compare that with the price of the city pass. If the savings are less than 15 to 20 euros, it’s probably not worth it — the pass takes away the freedom to change plans and doesn’t always guarantee line-skipping at every attraction.

    Sites like Compare City Pass let you compare passes from different operators side by side with up-to-date prices. For Paris, city-pass-paris.fr has a calculator that shows the real savings in 30 seconds.

    Pitfalls nobody tells you about

    City pass marketing highlights the theoretical maximum savings — the kind that only exists if you race from attraction to attraction without stopping. In practice, few travelers keep up that pace. Watch out for these points:

    Skip-the-line isn’t universal: some passes give priority entry at certain attractions but not others. The 2026 Roma Pass is the clearest example: it no longer guarantees line-skipping at the Colosseum, the very attraction most people want to visit in Rome.

    “Included” attractions that require separate reservations: museums like the Van Gogh in Amsterdam and the Anne Frank House are left out of several passes, even when the marketing materials suggest broad coverage.

    Automatic activation: many passes activate on first use and start counting consecutive days (not hours). A 2-day pass activated at 4 PM on Tuesday loses almost an entire day. Always activate early in the morning — a pass activated at 4 PM loses almost a full day.

    Overlap with tours: if you’ve already booked a guided tour that includes admission (for example, a guided Louvre tour), the pass doesn’t eliminate that cost — you end up paying twice for the same attraction.

    Historic tram at Praça do Comércio in Lisbon
    Lisbon — the Lisboa Card is one of the best-value European city passes. | Photo: PhotoByMau / Pexels

    Where to buy and how to activate

    Most city passes can be purchased online through the pass’s official website or on platforms like GetYourGuide and Klook, which occasionally offer 5% to 15% discounts during seasonal promotions. Buying online locks in the price in euros (avoiding unfavorable exchange rates at physical ticket booths) and lets you activate the digital pass right from your phone.

    If you’re combining a multi-city itinerary, buying individual tickets in advance can be smarter than getting a pass for every city. On the Rome, Florence, and Venice by train route, for example, the Rome pass doesn’t cover the other two cities — and buying three separate passes rarely pays off.

    Amsterdam canal with a church tower in the background
    Amsterdam — the I Amsterdam City Card includes a canal cruise, but not the Van Gogh Museum. | Photo: Γιώργος Παγούδης / Pexels

    Practical tips for making the most of your city pass

    Plan your pass days: pack the paid, pricey attractions into the days your pass covers. Days spent wandering neighborhoods, parks, and markets don’t need a pass — save those for before or after.

    Start with the most expensive attraction: with passes like the Roma Pass, where you choose which attractions to use as “free” entries, start with the ones with the highest ticket prices to maximize your savings.

    Check opening hours: many European museums close on Mondays (the Louvre, for instance, closes on Tuesdays). Activating your pass on a day when half the attractions are shut is money down the drain.

    Save a print or screenshot: data connections can fail in metro tunnels or museum basements. Keep your pass’s QR code saved offline or printed out.

    Frequently asked questions

    Is the European city pass worth it for everyone?

    The European city pass isn’t worth it for everyone. It pays off for travelers who visit at least 3 paid attractions a day and want to skip the lines. For those who prefer wandering neighborhoods, eating at markets, and hitting just 1 museum a day, individual tickets usually come out cheaper.

    How do I know if the city pass is cheaper than individual tickets?

    To figure out if the European city pass is worth it, list the attractions you plan to visit, add up the cost of individual tickets, and compare that to the pass price. If the savings are less than 15 to 20 euros, it’s probably not worth it. Sites like comparecitypass.com do this math automatically.

    Does the city pass’s skip-the-line access work at every attraction?

    The European city pass’s skip-the-line access doesn’t work at every included attraction. Each pass has different rules — the Paris Museum Pass gives priority entry at the Louvre and Versailles, but the Roma Pass 2026 no longer guarantees skip-the-line at the Colosseum. Check attraction by attraction before you buy.

    Can I use the same city pass in multiple European cities?

    No — each European city pass only works in the city it was purchased for. The Lisboa Card only works in Lisbon, the Paris Museum Pass only in Paris. For multi-city itineraries, weigh whether buying one pass per city makes sense or if booking individual tickets in advance is more economical.

    When should I activate the city pass to get the most out of it?

    Always activate your European city pass early in the morning on your first day of attractions. Most passes count consecutive days, not 24-hour periods — a 2-day pass activated at 4 PM loses almost a full day of use.

    Conclusion

    The European city pass is a useful tool, not an automatic buy. It works great for travelers with packed itineraries, hitting multiple paid attractions a day, and valuing skip-the-line access — but it can be money down the drain for those who travel on a whim or prefer street-level experiences. Run the 3-step math before you buy, be skeptical of generic savings promises, and remember that every city has different rules. For more Europe itineraries and money-saving tips, keep following VoyageVoyage.

    Before booking attractions and tickets, also check out how ETIAS works for Brazilians.

  • Lisbon, Paris, and London in One Trip: The Right Order

    🇧🇷 POR | 🇫🇷 FR | 🇺🇸 EN | 🇪🇸 ES

    Putting Lisbon, Paris, and London together in one itinerary is totally doable without turning into a race—but only if you think through the order of the cities and the transport between them before booking a single ticket. The most common mistake is planning the route alphabetically or on a whim, which forces you to backtrack and lose an entire day just moving between places you’ve already left behind.

    The most efficient route is usually London → Paris → Lisbon (or the reverse): London and Paris are connected by the Eurostar in 2h16, direct from city center to city center, while Paris and Lisbon are best done by plane, since the train between them takes 17 to 27 hours with transfers in Spain. For all three cities in one go, the sweet spot is 10 to 12 full days, with at least 3 full days in each destination.

    Getting there and getting around between the three cities

    The London-Paris leg is the simplest of the whole trip: the Eurostar leaves from St Pancras station in London and arrives directly at Gare du Nord in Paris in 2h16, with no stops and a quick check-in. Booking months in advance, Standard class tickets start at around €44 per leg (prices from July 2026)—worth buying as soon as your dates are locked in, because the price climbs as departure gets closer.

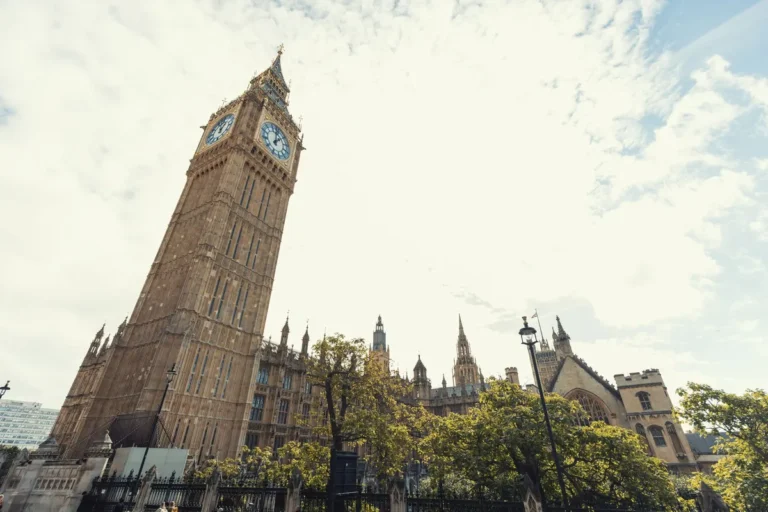
    Big Ben and Parliament in London
    London is usually the best gateway for this itinerary, with the Eurostar taking you straight to Paris. | Photo: Kao Jimmy / Pexels

    The leg to Lisbon, though, is a different story. By train, Paris-Lisbon takes anywhere from 17h39 (on the most direct connections) up to 27 hours, requiring 2 to 4 transfers, usually through Spain, according to data from railcc. For most two-to-three-week itineraries, it’s just not worth it: a direct flight from Paris-Lisbon or London-Lisbon takes about 2h15 and is operated by airlines like TAP Portugal, easyJet, and Vueling, usually with good fares if booked ahead (from €60-80 in July 2026, depending on availability).

    A common question is whether you can string all three legs together by train, including a direct London to Lisbon run. The answer is technically yes, but the full train journey between London and Lisbon takes 22 to 42 hours, which only makes sense if you’re doing the trip as part of the experience itself, with absolutely no rush to get there.

    Best time to go and how long to stay

    April through June and September through October are the most balanced windows for all three cities together: mild temperatures in London and Paris, and still without Lisbon’s intense summer heat. July and August pack all three cities at once, with inflated accommodation prices and longer lines at the most popular attractions.

    To avoid feeling like you just breezed through, plan at least 3 full days per city—that already adds up to 9 days of pure stay, plus travel time. A 10-to-12-day itinerary gives you room to include a day trip, like Versailles from Paris or Sintra from Lisbon, without sacrificing city time.

    Eurostar train exiting the tunnel on its way to Paris
    The Eurostar is the only leg of this itinerary where the train beats the plane. | Photo: Dan Wright / Pexels

    What to see in each city without rushing

    London

    Stick to 2 to 3 sights a day instead of trying to check off the whole list: Tower Bridge and the Tower of London in the morning, a stroll through Soho and Covent Garden in the afternoon, saving the British Museum or the National Gallery for a rainy day, since both deserve longer visits. If you have a free afternoon, Greenwich is a great day trip within the city itself, without burning a whole day of your itinerary.

    Paris

    Split the city by neighborhood instead of crossing all of Paris every day: one day for the Eiffel Tower and Trocadéro, another for the Louvre and Île de la Cité, and a third for Montmartre. This saves hours lost on the metro between opposite ends of the city. If you like going off the beaten path, it’s worth checking out neighborhoods like Belleville, with views, street art, and restaurants away from the most touristy circuit.

    Lisbon

    Set aside one day for the historic center (Alfama, Baixa, Chiado), another for Belém, with its monuments and the famous pastry shop of the same name, and consider a day trip to Sintra if you have an extra day. The complete Lisbon guide details a day-by-day itinerary for anyone who wants to make the most of this final leg of the trip.

    Eiffel Tower at dusk in Paris
    Splitting Paris by neighborhood avoids long hauls between tourist spots. | Photo: Josh Withers / Pexels

    How to fit all three into one itinerary

    An 11-day itinerary works like this: 4 days in London, Eurostar to Paris, 4 days in Paris, flight to Lisbon, 3 days in Lisbon before your flight home. This order avoids backtracking and makes the most of the only efficient train leg of the trip (London-Paris), saving the flight for the stretch where the train just doesn’t pay off.

    If you’d rather end in continental Europe to save on the final stretch, you can flip it: Lisbon first, then Paris by plane, and finish in London via Eurostar—the transport logic stays the same; only your starting and ending points change.

    It’s worth booking international trains and flights at least 60 days in advance: according to the official Eurostar website, Standard class prices rise steadily as the date approaches, and promotional fares disappear first on high-season dates (June through August and the eve of European holidays).

    One detail that often goes unnoticed: the time zone doesn’t change between the three cities (they all follow GMT/BST or Western European Summer Time), so there’s no jet lag to manage within the itinerary—just the logistics of luggage and check-in at each leg. If you’re looking to save on the financial side of the trip, you can also check out the guide on money in Europe, with card tips and a backup plan that work across all three countries on this route.

    Where to eat in each stop

    In London, covered markets like Borough Market make for a quick, varied lunch without a reservation, with prices ranging from £8 to £15 per dish (July 2026). In Paris, opt for neighborhood bistros away from the Champs-Élysées—they’re cheaper and just as good, with a fixed lunch menu usually running between €18 and €25. In Lisbon, the tascas in the Alfama and Bica neighborhoods typically serve daily specials for €8 to €14, well below the touristy restaurants in Baixa.

    Where to stay in each city

    In London, staying near King’s Cross/St Pancras makes catching the Eurostar a breeze without having to wake up at dawn. In Paris, the Marais or an area near Gare du Nord cuts down the trek to your next train or airport. In Lisbon, Baixa or Chiado puts you just a few minutes’ walk from the main attractions and well-connected to the airport.

    Yellow tram in the Alfama neighborhood of Lisbon
    Lisbon closes out the itinerary with Baixa and Chiado just a short walk from the sights. | Photo: Theo Felten / Pexels

    Practical tips for the logistics

    Book your Eurostar tickets well in advance: prices climb fast as the date approaches, and the cheapest fare classes sell out first. For the Paris–Lisbon or London–Lisbon leg, compare direct flights before you commit—TAP, easyJet, and Vueling usually have the best prices on this route. Pack light: with both train and plane on the same itinerary, a big suitcase becomes a hassle at every transfer.

    Before buying individual tickets, consider whether a European city pass makes sense for your trip. It’s also worth booking guided tours in each city ahead of time, especially the ones that tend to sell out in high season—like the night tour of Paris and the free walking tour of London, which are great for getting your bearings on day one in each city.

    Another thing that makes a real difference to your budget is currency: since this route uses both pounds and euros, it’s worth bringing an international card with no conversion fees instead of exchanging cash at airport bureaux de change, which usually offer a much worse rate than the market.

    Finally, check your travel documents well ahead of time: a passport valid for at least six months beyond your return date is required by both the UK and the Schengen Area countries (France and Portugal).

    Frequently asked questions

    How many days do I need for Lisbon, Paris, and London on the same trip?

    Ideally, 10 to 12 full days, with at least 3 full days in each city. Anything less turns the itinerary into a marathon of transfers instead of a trip you can actually enjoy.

    Is it worth taking the train from Paris to Lisbon?

    Usually not: the train journey takes between 17 and 27 hours with several changes through Spain, while a direct flight between the two cities takes about 2h15. The train only pays off if you want the journey itself as the experience, with no time pressure.

    What’s the best order to visit the three cities?

    London, then Paris, and finally Lisbon (or the reverse) is the most efficient order, because it makes the most of the Eurostar on the only leg where the train beats the plane, and saves the flight for the longest stretch.

    Do I need a visa to visit all three cities as a Brazilian?

    No. Brazilians can enter the UK, France, and Portugal visa-free for tourism for up to 90 days within the Schengen Area (France and Portugal) and under UK rules for London—just double-check your passport’s validity dates before you travel.

    Conclusion

    Pulling off Lisbon, Paris, and London in a single trip works beautifully when you put transport logic ahead of the urge to see everything: Eurostar between London and Paris, a short flight to Lisbon, and at least three full days at each stop. With that skeleton in place, the rest of the itinerary—tours, meals, accommodation—falls into place naturally. To dive deeper into each destination, Voyage Voyage has complete guides for every city to help you plan.

    To extend your trip in Portugal, check out the Madeira Island itinerary.

  • Kyoto Temples Without the Crowds: The Right Time for Each One

    Kyoto Temples Without the Crowds: The Right Time for Each One

    🇧🇷 POR | 🇫🇷 FR | 🇺🇸 EN | 🇪🇸 ES

    Visiting Kyoto’s temples without the crowds is totally doable with three simple timing tweaks: hit Fushimi Inari before 7:30 AM, catch Kiyomizu-dera right at its 6 AM opening, and roll into Arashiyama before 8 AM. Fushimi Inari gets packed after 9 AM, Kiyomizu-dera turns into a sea of umbrellas by noon, and Arashiyama’s Bamboo Grove fills up fast in the early morning — the trick is knowing when to arrive and when to swap a crowded classic for a nearby hidden gem.

    In a nutshell: get to Fushimi Inari before 7:30 AM, Kiyomizu-dera right at its 6 AM opening, and Arashiyama before 8 AM, saving part of the morning for a smaller temple like Tofuku-ji or Otagi Nenbutsuji. With this game plan, you can walk through the red gates without fighting for a photo, leave Kiyomizu-dera before the tour buses roll in, and still have Arashiyama almost all to yourself.

    How to get to Fushimi Inari, Kiyomizu-dera, and Arashiyama

    If you’re basing yourself in Osaka, you can knock out all three temples on a bullet-train day trip, since Kyoto is just 15 minutes away by Shinkansen. The three sites sit in different corners of the city, which is actually a plus: you can tackle each one in its own block of the day without crisscrossing Kyoto over and over. Fushimi Inari Taisha sits right next to JR Inari Station, just two stops from Kyoto Station on the JR Nara line (8 minutes, no transfers). Kiyomizu-dera doesn’t have a train station nearby — you’ll take a bus (line 100 or 206) to the Gojo-zaka or Kiyomizu-michi stop, then hike 10 minutes up through Ninen-zaka and Sannen-zaka. For Arashiyama, take the JR Sagano/Sanin line to Saga-Arashiyama Station, or the Randen tram — slower but way more charming.

    Corridor of red torii gates at Fushimi Inari Taisha shrine in Kyoto
    The thousands of torii gates at Fushimi Inari are only free of photo-crowds in the early morning hours. | Photo: Lucas Tran / Pexels

    Since the three temples aren’t close to each other, structure your day in blocks: Fushimi Inari first thing in the morning (it’s the only one open 24 hours, so it pays to go first), Kiyomizu-dera right after via the JR line to Kyoto Station and a bus transfer, then Arashiyama in the afternoon, when the heat has eased a bit and the organized tour groups start thinning out.

    Best time to visit and how long to budget

    According to the Japan National Tourism Organization, the months of March through May (cherry blossom season) and October through November (autumn leaves) bring the highest visitor numbers of the year — not the best time to dodge crowds, but exactly when the early-bird strategy pays off most. Budget at least half a day for Fushimi Inari (the full climb to the top of Mount Inari takes 2–3 hours round trip, but 45 minutes covers the most photographed sections), 1 to 1.5 hours for Kiyomizu-dera including the stroll through the historic lanes, and a full afternoon for Arashiyama, which packs the bamboo grove, the Hozugawa River, and Tenryu-ji temple all within a 20-minute walk.

    How to hit Fushimi Inari, Kiyomizu-dera, and Arashiyama without rushing

    The difference between arriving at Fushimi Inari at 7 AM versus 9 AM is thousands of people at the entrance. Since the shrine runs 24 hours a day, with no gate or closing time, the first torii gates — the most photographed ones, right at the base — stay practically empty until around 7:30 AM. After that, tour buses start dropping off groups and the trail turns into a conga line.

    Fushimi Inari: before 7:30 AM or at dusk

    Arrive via JR Inari Station before 7:30 AM. Climb up to the Yotsutsuji viewpoint (halfway up, about 30–40 minutes of moderate uphill) to see the densest torii corridor without a single person in your shot. If you’d rather sleep in, you can repeat the strategy at dusk, since the shrine never closes — but the natural light makes for better photos in the morning.

    Kiyomizu-dera: right at the 6 AM opening

    Kiyomizu-dera opens at 6 AM and closes at 6 PM (admission ¥500, as of July 2026 — double-check the official website before your trip), making it a rare early opener among Kyoto’s temples. Arriving between 6 and 7 AM means having the wooden deck over the valley and the view of the Koyasu pagoda practically to yourself — after 9 AM, the Ninen-zaka and Sannen-zaka approach streets are already jammed with tour groups and packed souvenir shops.

    View of Kiyomizu-dera temple perched on a hill in Kyoto
    Kiyomizu-dera’s wooden deck, suspended over the valley, empties out between its 6 AM opening and 8 AM. | Photo: Irina Senti / Pexels

    Arashiyama: before 8 AM, before the tour buses

    Arashiyama’s Bamboo Grove stretches about 400 meters and is free, with no entrance gate — which also means no crowd control. Getting there before 8 AM keeps you ahead of the moment it turns into a shoulder-to-shoulder corridor of people. Pair it with a walk across the Togetsukyo Bridge and a stop at Tenryu-ji temple (¥500 admission for the garden), which opens at 8:30 AM and tends to stay peaceful for the first half hour.

    Path between tall bamboo stalks in Arashiyama's Bamboo Grove in Kyoto
    Before 8 AM, the path through Arashiyama’s Bamboo Grove is still free of tour groups. | Photo: Faruk Tokluoğlu / Pexels

    Smaller temples to swap in for the crowded classics

    When the early-morning strategy isn’t an option, or when you’ve already hit the essentials and have half a day to spare, Kyoto’s smaller temples deliver the same atmosphere as the classics without the crowds. None of them require advance reservations, and most sit just minutes by train or bus from the well-known spots.

    Tofuku-ji: one stop from Fushimi Inari

    The Zen temple Tofuku-ji is just one JR stop from Fushimi Inari (Tofukuji Station, 2 minutes by train or 20 minutes on foot) and ranks among Japan’s most important Zen temples, with rock gardens and the famous viewpoint over the Tsutenkyo Bridge. It’s a natural stop for anyone already in the Fushimi Inari area who doesn’t want to repeat the same shrine.

    Garden and architecture of the Zen temple Tofuku-ji in Kyoto
    Tofuku-ji, one train stop from Fushimi Inari, draws a fraction of the crowds of its neighboring shrine. | Photo: Dmitry Romanoff / Pexels

    Otagi Nenbutsuji: an Arashiyama alternative

    About 20 minutes on foot past the Bamboo Grove, Otagi Nenbutsuji houses more than 1,200 stone statues (rakan), each with a different facial expression, carved by visitors over the decades. Because it sits farther from central Arashiyama, it draws a fraction of the crowd that passes through the bamboo forest — even in peak season, it’s common to wander among the statues without crossing paths with anyone.

    Gio-ji: the moss temple near Arashiyama

    Small and tucked away, Gio-ji is known for its moss-covered garden and its connection to the story of a Heian-period dancer. It’s about a 15-minute walk from the Bamboo Grove, in the opposite direction of the main tourist flow — a smart pick for anyone who’s already seen Tenryu-ji and wants a quiet counterpoint in the same afternoon.

    Where to eat between temples

    If you’re finalizing an Asia itinerary and have already been through Taipei, you’ll notice that the logic of avoiding peak hours at temples repeats itself in almost every crowded Asian destination. Near Fushimi Inari, the street leading to JR Inari Station is lined with traditional stalls selling yatsuhashi (cinnamon sweets) and inari-zushi skewers—perfect for a quick breakfast before the climb. In the Kiyomizu-dera area, Ninen-zaka and Sannen-zaka streets are packed with matcha shops and traditional sweets, best enjoyed right after your temple visit, before they fill up with people. In Arashiyama, the area around Saga-Arashiyama Station is home to artisan tofu and soba noodles—a great lunch option after your walk through the bamboo forest.

    Where to Stay to Get an Early Start Without the Rush

    Staying near Kyoto Station or in the Fushimi district makes it easy to head out at dawn for Fushimi Inari without depending on the first morning train—the Fushimi neighborhood, by the way, deserves a stop of its own for its traditional sake breweries and canals, far less touristy than the historic center. If you’re prioritizing Arashiyama and Kiyomizu-dera, staying close to Kyoto Station remains the most balanced option, with direct train and bus connections to both areas.

    For a more complete comparison of the city’s neighborhoods, the guide on where to stay in Kyoto on your first trip breaks down the differences between Kyoto Station, Gion, and Kawaramachi for anyone deciding where to book their hotel.

    Practical Tips for Beating the Crowds

    Bring cash for the smaller temples—many still don’t accept cards. Avoid Saturdays, Sundays, and Japanese holidays for any of the three classic temples: the volume of local visitors adds to the foreign crowds and cancels out much of the benefit of arriving early. Download the area map offline before you head out, since cell signal tends to drop on the Fushimi Inari trails and in the residential neighborhoods around Arashiyama—and avoid cutting through narrow residential streets outside business hours, as these are lived-in neighborhoods, not part of the tourist attraction.

    Frequently Asked Questions

    What’s the best time to visit Fushimi Inari without the crowds?

    The best time is between 6 a.m. and 7:30 a.m., since Fushimi Inari Taisha Shrine is open 24 hours and the first stretches of torii gates are practically empty until the tour buses start arriving around 9 a.m.

    What time does Kiyomizu-dera open?

    Kiyomizu-dera opens at 6 a.m. and closes at 6 p.m., with admission at ¥500 (as of July 2026). Arriving right at opening time gets you the wooden deck overlooking the valley without the flow of tour groups that forms from 9 a.m. onward.

    Can you visit Fushimi Inari, Kiyomizu-dera, and Arashiyama in the same day?

    Yes, but it requires an early start: Fushimi Inari at sunrise, Kiyomizu-dera right after, and Arashiyama in the afternoon. Since the three are in different directions from the city center, the travel time eats up a good chunk of the day—if you prefer a more relaxed pace, split it into two days and add a smaller temple.

    Which temples can replace Fushimi Inari and Arashiyama when they’re packed?

    Tofuku-ji is a great stand-in for Fushimi Inari, just one train stop away, with zen gardens and far fewer visitors. Otagi Nenbutsuji and Gio-ji can replace the Arashiyama outing, offering the same forest-and-traditional-temple atmosphere just a few minutes’ walk from the more touristy area.

    Conclusion

    If your itinerary includes Tokyo before or after Kyoto, it’s worth applying the same early-bird logic to the capital’s most crowded temples. Kyoto rewards those who rise early: the same temples that turn into corridors of people by noon become almost private experiences for anyone arriving before 8 a.m. Combine Fushimi Inari, Kiyomizu-dera, and Arashiyama into a staggered itinerary, leave room for a smaller temple like Tofuku-ji or Otagi Nenbutsuji, and Voyage Voyage promises: you can see the essentials of Kyoto without giving up the quiet, contemplative experience that makes these places worth the trip.